Dave Giddings is passionate about the boating industry, working with wood and helping others. This is his story of how the repair of the James Craig took place
Following the success of repairing the James Craig Top Mast sections back in 2013 and 2014, there was no hesitation in repairing the Jib Boom when it was displaying evidence of degradation. Why did they not use a Douglas Fir (Oregon) log to replace the Jib Boom?
Believe it, there was a stand of Douglas Fir trees planted at Laurel Hill in southern NSW back in 1927 as an experiment to see if Douglas Fir could handle the Aussie climate. Fortunately for Sydney Heritage Fleet they were very slow growing. The trees were burned in the 2019 fires, but the logs were satisfactory. They were culled to make way for a new forest to be established, as pine will not rejuvenate after fire like Eucalypts. Peter Gossell had previously identified this stand and scored some logs for spars on his own yacht. The Sydney Heritage Fleet was fortunate that Forestry NSW donated several logs to them to use for replacement spars for its heritage vessels. Another kind donor has provided storage for the Douglas fir logs. These need several years to release moisture and stabilise before they can be used. Therefore it was necessary to repair the original Jib Boom using Slabs of imported Oregon from USA.
During a recent inspection of the Jib Boom, deterioration was identified with significant rot hidden below the Inner Forestay Deadeye. It had pulled foreward as shown in Figure 1. Also note the cracking and dark grey timber foreward of the Deadeye which is a classic sign of degraded timber. The load pulling on the deadeye was crushing the timber on the damaged side. The gap at the other side then allowed more water to build up and soak into the timber on the damaged side exacerbating the problem.
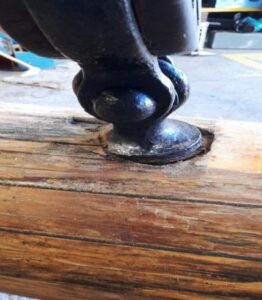
Figure 1 – Inner Forestay Deadeye with Signs of Rot
If James Craig spent her life at sea the degradation would have taken much longer for the timber to degrade due to salt water splashing over the bow and providing protection to the Oregon. The problem occurred due to rainwater creating a damp environment in which rot spores had a field day. The extent of the damage at the Deadeye can be seen at Figure 2. Plus, it looks like someone has scarfed in a section of Oregon adjacent to the Deadeye in the past.
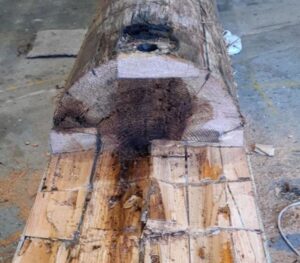
Figure 2 – Extent of Degradation of Timber at Deadeye
When the first restoration of an Oregon spar for James Craig was carried out to the fore Top Mast section back in 2013, it created some trepidation as such a repair was new to the current Sydney Heritage Fleet Shipwrights and team. The process for the repair was published in AABB85. When the Main Top Mast displayed similar degradation in 2014 there was no hesitation in calling on Master Shipwright, Peter Gossell’s expertise to replicate the repair process by scarfing in a new section using the same technique used on the fore mast, except larger slabs of Oregon were used to reduce the amount of gluing required and cut down on the timeframe to complete the glue up using EPOX-E-Glue from the team at BoatCraftNSW.
The extent of rot to the Jib Boom is shown at Figure 2 as the damage was chased along the spar for almost 3 metres before establishing sound timber with the degraded timber piled up in Figure 3.

Figure 3 – Firewood Pile demonstrating extent of Rot
Some past cosmetic maintenance had been carried out in good faith by volunteers which has contributed to several other areas of rot. As the Oregon in the spar section expanded and contracted, due to humidity and temperature change, several cracks opened up over time. The cracking was natural and did not have a significant effect on the spars strength, as most cracks only extend into the timber 15 to 25mm as shown in Figure 4 after the degraded timber was chased back to stable timber.
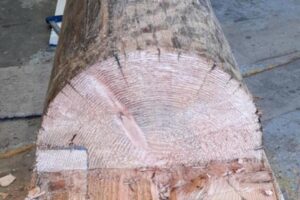
Figure 4 – Stable Oregon demonstrating extent of Cracking
The cosmetic measure involved filling the cracks with a modern black sealant as shown in Figure 1 and at figure 2 in the spar in the background. Over time the sealant pulled away from one edge due to the timber movement, allowing fresh water to find its way into the timber. The problem was that this allowed the timber under the sealant to stay moist allowing rot spores to have a field day as shown in Figure 2 and 3. The cracks should have been allowed to naturally open and close with change of humidity, or Filled with Jeffrey’s Marine Glue. As used to seal the gaps in the timber deck beams on the James Craig. The reason is that Jeffrey’s Marine Glue remains flexible and will expand and contract at a similar rate to the timber.
The modern technique would have been to dry the area around cracks and fill it with Bote-Cote high solids epoxy resin with Timber Preservative and Reactive Diluent Agent (TPRDA) added. This would have also glued the cracks. The reason for using the TPRDA in this application is that it will allow the Bote-Cote resin to draw into the smallest of cracks to handle the timber movement. Plus it makes the Bote-Cote more flexible in the open cracks. Some black pigment could also be added to make it look more authentic.
The decision was made to scarf in new slabs of clear grain Oregon and gluing it all together using Epox-E-Glue. The shipwright who carried out the first repair had become sensitised to old technology epoxies and would not use them as he had developed sensitivity. He did not want to further expose himself to increased sensitivity and exclusively used EPOX-E-Glue & Bote-Cote Epoxy Resin. This is due to the modern technology chemicals that make them much safer to use and did not cause sensitivity issues for him.
Peter also uses EPOX-E-Glue & Bote-Cote Epoxy Resin as they were developed especially for working with timber in Australian conditions. BoatCraft Pacific reduced the Tensile Strength of their epoxies slightly. The result is an epoxy not as brittle as most other epoxy glues and resins available. The reason for this is to enable the epoxy to handle the expansion, contraction and flexing of timber. Plus the EPOX-E-Glue has a considerably longer working time, which was important with the large surface areas being glued up. In addition, it is much easier to mix in larger quantities with its 1:1 ratio.
To give you an idea of the scale of the operation the dimensions of the spar are square at 350 x 350mm and round section being 350mm Diameter at the inboard end with an overall length of 15.5 metres and weighing in at 650kg. As you can see it is not a log you can throw over your shoulder to carry around. The operation had to be planned & coordinated to maximise the Sydney Heritage Fleet volunteer’s availability and ensure the James Craig was not out of service for too long. As there was a major commitment booked in for early July. The Project Management for this detailed evolution fell on the busy shoulders of Tim Drinkwater who is the Fleet’s Operations manager.
The first step was to cut off the offending section of Jib Boom where the timber had degraded as demonstrated at Figure 3. They started the evolution by making a series of cross cuts with a chainsaw to a bit above the guide battens marking half the depth. Then Peter expedited this task using his trusty Adze. The Adze is capable of removing large amounts of timber in a controlled manner in a minimal timeframe as shown at Figure 5 with accuracy when in experienced hands. Once the Oregon was cut away it showed the Jib Boom had previously been repaired as shown in Figure 2, 3 & 4, using mainly 100 x 100mm Oregon on the bottom half up to the Deadeye.
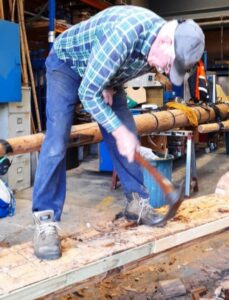
Figure 5 – Master Shipwright Using Traditional Skills
The bottom half of the degraded spar was left in place to provide a datum to support gluing the first two slabs of Oregon in place. The next step was to shape in a 1 in 12 taper for the scarf as shown at Figure 6 on one side of the good mast section. Starting out with a chainsaw by cutting grooves down to just above the guide battens set up to identify the taper required. Imagine the time it would take to clean up the spar ready for gluing only using traditional hand tools.
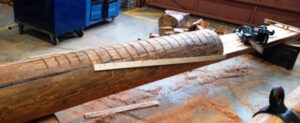
Figure 6– Modern Tools to speed up the Task
The taper takes considerable skill following up with the Adze and using a No. 7 hand plane to level and flatten the surface using a Spirit Level Athwartships s shown in Figure 6. The length of taper is important to facilitate maximium surface area to glue up, ensuring the timber at the glued joint will not pull away. Figure 7 demonstrates the straight edge confirming the taper flat and even across the spar. The same tapered scarf is applied to the 5 metre lengths of new 300 x 100mm Oregon, sourced from Harper Timbers at Pendle Hill.

Figure 7 – Tapered Scarf Section of the Jib Boom
Normally, the end grain on the scarfed surfaces needs coating with Bote-Cote Epoxy Resin, first. This is to wet out the timber to ensure the end grain is saturated to eliminate the joint being starved of glue due to resin being drawn out of the glue into the end grain. As Peter is experienced with using EPOX-E-Glue, I knew there would have been ample Glue in the joints. When using Epoxy Glues, it is important to not squeeze all of the glue out of the joint or it will result in a weak joint. Clamping should only be firm enough to ensure the joined timber cannot move and ensure there is Epoxy to the edge of all areas of the joint as demonstrated at Figure 8.

Figure 8 – New Oregon Slabs Glued and Clamped
This was achieved by using heaps of clamps. After 24 hours, the beast was rolled over and the other side was laminated using the same technique. By the way, the longer it takes Epoxy Glue to cure, the tougher and stronger it will be.
Once glued up, Master Shipwright, Peter Gossell and team moved onto the job of shaping the Jib Boom and restore its character. This took many hours of patient planing with modern and traditional wood working tools & skills as shown in Figure 9. The process involved turning the square into an octagon, then taking it to 16 sides, 32 sides and finally 64 sides using the No. 7 hand plane to finish off. From there it is easy to plane the surface round, taking out any lumps and bumps with a sander.
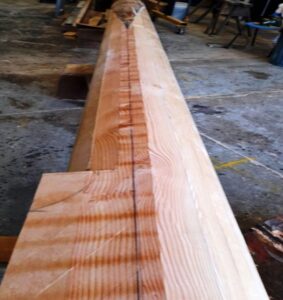
Figure 9 – The Jib Boom Shaped to sixteen sides
Then it was time to work on the inboard end using the drawing at Figure 10 to precisely replicate it to the designed shape and size. The finished Jib Boom shows the inboard end as depicted in Figure 12. Plus note the colour difference in the timber on the restored section.

Figure 10 – The Inboard End Jib Boom Specifications
A new design by Peter for the Deadeye was fabricated to eliminate the previous point load placed on the Jib Boom as shown fitted at Figure 11 and position on the spar at Figure 12. Plus it created a stronger spar by eliminating a large hole through a critical section of the Jib Boom.
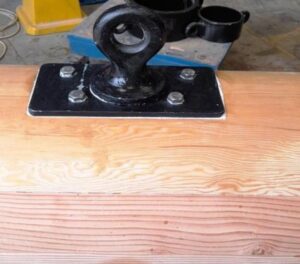
Figure 11 – Modified Deadeye fitted to Jib Boom
Once all of the wood butchering was completed, it was back to the riggers to hoist the beast into place using the ships rigging as shown at Figure 12.
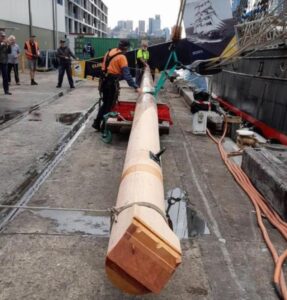
Figure 12 – Jib Boom Ready for hauling into Place
This task requires considerable sailing ship skill and coordination to ensure the boom was safely moved into position as depicted at Figures 12 & 13. Then all of the rigging and fittings had to be set up to bring the James Craig back to operational readiness in time to meet its commitment.
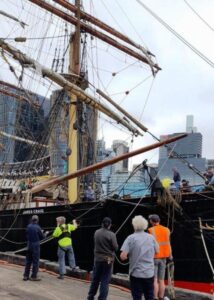
Figure 14 shows the Jib Boom shipped home and rigging being set up – BRAVO ZULU team.
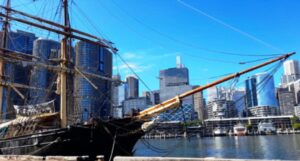
Figure 14 – Jib Boom In position
The fact that the James Craig has been fully restored & maintained in operational service is a credit to the many volunteers who keep her in pristine condition and take her to sea regularly with paying passengers. I recommend a trip on James Craig to anyone with or without salt in his or her veins to experience what it was like to be at sea in a square rigger.
Make sure you put it on your “bucket list” by contacting the Sydney Heritage Fleet at www.shf.org.au or telephone 02 9298 3888. The Sydney Heritage Fleet is in need of volunteers of all vintages for vessel maintenance and operation, archiving to model making / restoration & computer skills. It is a great organisation having the largest fleet of operational vintage vessels in the southern hemisphere. Expertise is not essential, just a willingness to learn as training is provided.
With the knowledge gained, you will have the capability to repair a rotten or broken spar. Or if fabricating a new spar it will give you the confidence to make a long spar with available sized timber scarfed and glued. Hoop pine is an excellent timber for making spars as No. 1 grade is clear grain and excellent timber to shape as it is fine grained and does not splinter. In many cases if you laminate several lengths of recycled or new timber the spar will be as strong, if not stronger than trying to source a solid length of timber which is clear grain at an exorbitant price. The team at BoatCraftNSW are able to assist with Hoop Pine and EPOX-E-Glue for the fabrication and Clear System for sealing and longevity of the coating in full sun.

Dave Giddings is the Business Manager at DRIVE Marine Services and BoatCraftNSW. He loves promoting the building of canoes by youths who have become disengaged from academia, disadvantaged or disabled who love getting their hands dirty is one of his passions.
As a teenager he liked building things and playing around with repurposing Austin A40 vehicles. He joined the RAN (Royal Australian Navy) as a 16-year-old where he revelled in fitting work and loved the machine shop tasks. He devoted 22 years to the RAN starting out as an apprentice Marine Technician and finishing at the esteemed position of Warrant Officer and enjoyed every minute of it. The experience & skills gained provided a great love of steam & a healthy respect of the sea.
During a shore posting in the early 80’s he learnt to sail to ensure he maintained the salt in his veins. This developed into a love of mucking around with boats and he has been the proud owner of a Clansman since 1994. In the last 25 years he has developed expert knowledge of what works and has a nose for chasing the safest products available. Based on his marine engineering background Dave has developed in-depth knowledge in Safer Ways to Work with modern technology products. Dave’s passion for educating others is due to a shortage of PPE and OH&S during his early days at sea. His sinuses cause issues on a daily basis which drugs struggle to control. This occurred as a result of painting out tanks on a ship with solvent based paints along with using some chemicals now banned.
On retirement from the RAN, he came across the BoatCraft Pacific products which are based on modern technology chemicals that are much safer and easier to use by amateurs & professionals. Dr Bruce McConkey developed a full range of adhesives and coatings for building, repairing and restoring boats from modern composites to a 100+ year old vessel. The bonus is no Dangerous Goods and the product range can be sent by post or courier to anywhere in Australia.
DRIVE Marine Services is morphing into BoatCraftNSW to better reflect their diverse product range for those playing with boats. The staff are happy for people to call or email the business with their requirements. They note that ‘Males do not read instructions until they stuff up’ and ‘There is no such thing as a silly question’.
Dave is working on completing the Building Instructions for the Muck-A-Bout canoe for those interested in purchasing them or sponsoring a build program in their area. He can be contacted on Ph: 02 9533 5470, Mob: 0412 366 998, you can see him on his YouTube Channel – The Epoxy Guru, or you can visit the website, www.BoatCraftNSW.net .